This guide is designed to provide a thorough understanding of the key steps and considerations in measuring and installing kitchen or bedroom units. Whether you're planning a new installation or upgrading existing spaces, this resource offers valuable insights into the materials, tools, and techniques necessary to achieve a professional finish.
From accurate room measurements to planning the layout of appliances and units, this guide covers all the essential aspects to help you create a functional and aesthetically pleasing space tailored to your needs.
Measuring Your Area for Kitchen or Bedrooms [Download the PDF Guide]
-
Gather Comprehensive Information: The more detailed the measurements, the easier it is to plan your space.
-
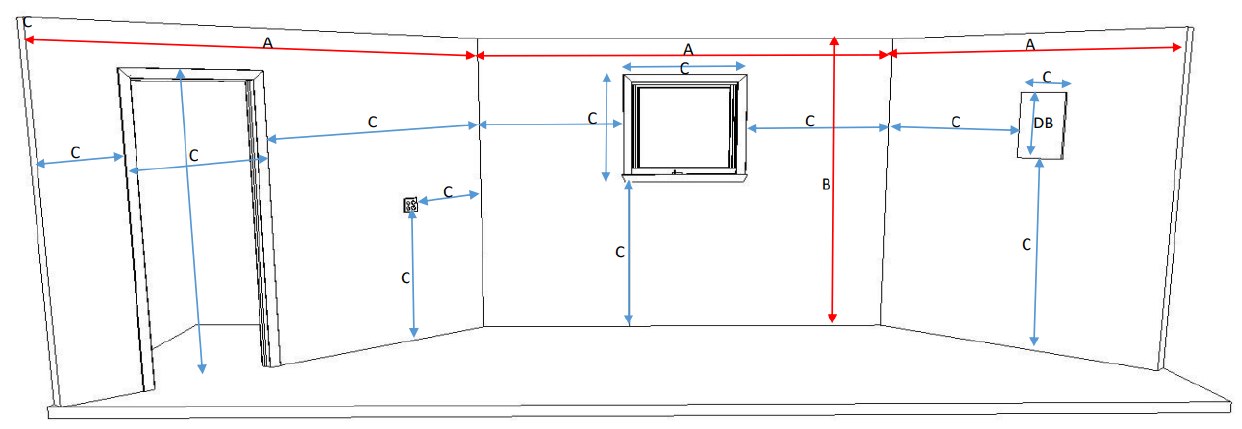
Measure Wall Lengths: Measure the length of the walls from corner to corner. (Line A)
-
Measure Ceiling Height: Measure the height of the ceiling from the floor. (Line B)
-
Measure Doorways, Openings, and Windows:
- Measure the distance of doorways, openings, and window frames from the wall corners.
- Record the height of the frames from the floor and the dimensions of the frames. (Line C)
- Note the direction in which doors open.
-
Record Fixed Items: Measure the position of fixed items such as the DB board, electrical outlets, and plumbing that cannot be moved. (Line C)
-
Measure Appliances: Take measurements of all appliances to be installed. For example, a fridge might be 1800mm high x 600mm wide x 600mm deep.

Product, Measuring, Planning, Installing [Download the PDF Guide]
Carcasses
- White melamine Grade A 16mm boards.
- White masonite 3mm backing board.
- 1mm impact white edging to visible edges.
- Clear studs for pre-drilled holes.
- Bearing full extension drawer runners.
- Adjustable plastic legs, either 150mm or 100mm in height.
- White melamine Grade A 16mm boards.
- 1mm impact white edging to visible edges.
- Hinge holes for concealed hinges.
- Various colours are available to select from.
Doors and Drawer Fronts
- White melamine Grade A 16mm boards.
- 1mm impact white edging to visible edges.
- Hinge holes for concealed hinges.
- Various colours are available to select from.
Planning
- Work out the rough position for the sink, oven, fridge, and other appliances.
- Start from the corner, work the units around as required to fill the area.
- Always allow a filler piece when finishing against a wall.
- Do not plan a perfect fit of the units between walls, as they are rarely plumb.
- Wall height is governed by the tallest unit, if one is used.
- Try to place wall units the same width as the floor unit below (Clean lines).
Multiple uses for the units
- The units can be used for kitchens, bedrooms, offices, storerooms, and more.
- Custom-made units can be manufactured to suit any purpose.
Installation
- Level a line around the room at 880mm from the finished floor (Tiles, etc.).
- Start in the corner by getting the unit level and plumb, top level to the line.
- Remember, the more time spent leveling, the easier it is to fit doors, etc.
- Clamp the next unit, making sure the front and top are flush.
- Fix units together using 6 x 30 screws.
- Continue along the section, screwing the units together.
- Check levels and fix to the wall using 6 x 70 Hammer fix screws.
- For the wall units, cut some props to the required height needed for support.
- Fix wall units to the wall, level and plumb, then clamp the next unit, and so on.
- Clean units with thinners and then Handy Andy to remove the odour of thinners.
Fitting Pack
- 6 x 30 Chip screws
- 6 x 16 Chip screws
- 6 x 70 Hammer fix
- Painters mate
- Silicon
- Thinners and rags
Tools Needed
- Jigsaw
- Masonry Drill + 6mm drill bit
- Cordless Screwdriver
- Level
- Skill Saw
- Combination Square
Worktops
- The tops should be cut with a skill saw upside down to avoid chipping the finished side.
- They can then be screwed through the top rail of the floor carcass using 6 x 30 screws.
